Tuesday, December 31, 2013

Goodbye 2013 & Happy New Year 2014


2013 has been a wonderful year for me. A lot of accomplishment that have been made for the past 12 months.  At least a more consistency in blogging, I managed to write at least three entries each month, sometimes more. Owh! I finally have my own dotcom :)...

There were also many firsts in terms of baking experiment that made myself very proud because they were all a successful ones. I baked my first Challah, I finally have my first successful pudding...and my first tiramisu....so yummy. And then there were my first Blueberry Mascarpone Roulade, first chili beef queso, the most delicious Lemon Mascarpone Layer Cake and of course my first quiche to conclude the 2013.

Wishing for a more prosperous and wonderful baking year of 2014.

Monday, December 30, 2013

Mushroom & Cheese Quiche


This weekend has been a quiche challenge weekend. The first quiche case that I made on Saturday was a bit hard and the base was a bit undercooked. But the filling was nice and yummy so the kids just eat the filling and discarded the undercooked crust.

The next day I tried it again and it was wonderful. The crust perfectly cooked, the filling of course so yummy and it is just another successful weekend baking.


Ingredients:
Crust
1 3/4 cups all purpose flour
1/2 tsp salt
1/2 cup cold unsalted butter, diced
1/4 cup cold iced water

Filling
3 tbsp unsalted butter 
1 large onion - diced
4-5 medium sized portabello mushrooms - sliced
6 medium sized white button mushrooms - sliced
1 small capsicum - diced

Salt & pepper to taste
90g shredded cheddar or edam cheese
3 eggs
300ml cream
A handful of chicken pepperoni slices - optional

Instructions:
Crust

  1. In a medium mixing bowl, sift together the flour and salt. Add in the cold butter and rub it into the dry ingredients until it resembles coarse breadcrumbs. Add a tablespoon of cold water at a time and knead until it forms a soft dough. You may not need to use all the water. Form the dough into a ball and wrap it in a plastic wrap. Refrigerate for 20 minutes.
  2. On a lightly floured surface, roll out the dough into a circle with a diameter of 10 inches. Line an 8 inch tart pan with the pastry. Press down into corners and sides. Trim the edges or crimp it if you want. Wrap it with a cling film and return it to the refrigerator and chill for another 15 minutes. You may want to start working on your filling at this point.
  3. Preheat the oven to 200C at least for 15 minutes. Prick the pastry base. Line the pastry case with a parchment paper and fill the top with rice, beans or pie weight. Bake for 15 minutes. Remove the pie weight and paper and bake for another 5 minutes. Set aside to slightly cool.
  4. Lower the oven temperature to 180C.

Filling

  1. On a medium saucepan over a medium heat, melt the butter and add in the onion. Cook the onion until translucent. Add the mushrooms and cook until the liquid reduced. Add in the capsicum, salt and pepper. Cook for another minute and remove from heat.
  2. In a medium mixing bow, whisk together the eggs and cream.

Assembly
Pour the mushroom filling into the pastry case. Arrange the pepperoni on top and sprinkle with shredded cheese. Slowly add the egg and cream mixture into the filling.
Bake for 40 minutes or until the filling is set.


Thursday, December 26, 2013

Churros

Taken from my Samsung S3 phone....couldn't get hold of the camera as it disappeared too fast
Churros
(Adapted from Poires au Chocolat)

Ingredients

140ml water
2 tbsp brown sugar
55g unsalted butter (cut into 1/2 inch cubes)
Pinch of salt
60g all purpose flour
1 egg
1/2 tsp vanilla extract
Vegetable oil for deep frying
Castor sugar for coating

Instructions
  1. Combine together the water, butter, sugar and salt in a small saucepan and bring it to a low boil. Using a silicone spatula, fold in the flour and stir until the mixture comes together and begins to roll into a shiny ball.
  2. Take it off the heat and continue to stir for an additional 2 minutes and let the mixture slightly cool down for about 5 minutes.
  3. Add the eggs and vanilla and stir until fully incorporated.
  4. Scoop the mixture into a pastry bag fitted with a medium star tip.
  5. Heat up 2 inches vegetable oil in a medium pot or saucepan to 180C. Pipe a few inches of the soft dough into the hot oil, use a pair of scissors to cut the tip before piping another one. Once it started to brown, turn it over and cook until it turns golden brown on each sides. About 1 minute on each side.
  6. Scoop out the churros using a slotted spatula or tong and transfer them into a kitchen towel to absorb the excess oil.
  7. Toss them into the caster sugar.It is best eaten while warm with chocolate sauce.
For the dipping sauce:
75g dark chocolate
100ml double cream
1/2 tsp cinnamon
1/2 tsp sugar


Put the cream, cinnamon and sugar into a small pan and heat until nearly boiling. Chop the chocolate up and place it in a small bowl. Pour the cream mixture over. Leave it for a few minutes then stir until smooth.


Saturday, December 21, 2013

Tropical Carrot Cake


Combination of ingredients in this version of carrot cake that includes lots of shredded carrots, toasted shredded coconut and pineapple ensuring it stays supermoist even after a few days in the refrigerator. Other than that...it is just tasty and coconut lovers will definitely indulge this.

Ingredients:
Cake
2 cups all purpose flour
1 1/2 tsp baking soda
1 tsp salt
1 tsp mixed spice or ground cinnamon
3 large eggs
1 1/2 cups sugar
1 cup canola or vegetable oil
1 tsp vanilla extract
3 cups shredded carrots (from 3-4 large carrots)
1 can crushed pineapple, drained
1 cup shredded coconut, lightly toasted
1/4 cup chopped walnuts
1/4 cup dried cranberry or any raisins of your choice

Cream Cheese Frosting
1 cup cream cheese, at room temperature
60g unsalted butter, at room temperature
1 tsp vanilla extract
1 cup icing sugar, sifted

Instruction:
Cake
  1. Preheat oven to 180C and grease a 9 inch baking pan
  2. In a medium bowl, sift together the flour, baking soda, salt and spice. 
  3. In a large mixing bowl, whisk together eggs, sugar, oil and vanilla. Stir in the carrots, pineapple and coconut. Fold in the flour mixture just until incorporated. Stir in the nuts and raisins.
  4. Spread the batter in the prepared pan.
  5. Bake for 30 minutes or until a cake tester inserted into the center of the cake comes out clean.
  6. Let the cake cool in the pan on a wire rack for about 15 minutes then invert it onto the wire rack. Let it cool completely.
Cream Cheese Frosting
  1. In a mixing bowl of a stand mixer fitted with a flat beater or a handheld mixer, beat the cream cheese, butter and vanilla until smooth and fluffy, about 2 minutes. Gradually add the sugar and continue beating until it is smooth and thoroughly combined.
  2. Frost the cooled cake accordingly using an icing spatula.


Friday, December 20, 2013

Butterscotch Blondies


Ingredients:

1/2 cup unsalted butter
2 cups lightly packed brown sugar
1 cup whipping cream/heavy cream
2 tsp vanilla extract
1 tsp salt
2 cups plain/all purpose flour
1 tsp baking powder
2 large eggs
Confectioners' sugar - for dusting


Instructions:
  1. In a saucepan, melt the butter over medium heat. Using a silicone spatula, stir the brown sugar until it starts bubbling, about 4 minutes. Reduce the heat to medium low, stir in the cream and let it bubble and start whisking until smooth and slightly thickened , about 10 minutes. Stir in the vanilla and salt. Let it cool to room temperature.
  2. Preheat your oven to 180 degree Celsius. Grease a 9 inch baking tray with butter.
  3. In a large mixing bowl, whisk together the flour and baking powder. Stir the butterscotch mixture into the dry ingredients, then whisk the eggs one at a time until it is well blended.
  4. Spread the batter into the prepared pan and bake for 18 minutes.
  5. Remove from the oven, let cool completely and indulge it with chocolate sauce, ice cream,or whipped cream and some berries! Or just dust some confectioners' sugar on top and enjoy.

Friday, December 13, 2013

Lemon Squares


Ingredients:

Crust
3/4 cup plain flour
1/4 cup confectionery/icing sugar
A pinch of salt
90gm cold unsalted butter, cut into 1/2 inch cubes

Filling
3 large whole eggs
3 large egg yolks
1 cup caster sugar
3/4 cup freshly squeezed lemon juice, strained (about 3-4 medium lemons)
90gm soft unsalted butter
1 tsp grated lemon zest

Instructions:

Crust
  1. Preheat the oven to 180 degree Celsius and butter an 8 inch square baking pan.
  2. In large mixing bowl, combine flour, icing sugar and salt, stir until blended. Fold in the butter and mix until it resembles coarse breadcrumbs.
  3. Press the crumb mixture into the bottom of the prepared pan. Bake the crust for 15-17 minutes until slightly golden and the top feels firm when lightly touched. Set aside.
Filling

  1. Set a saucepan filled with 1 inch water over a medium heat.
  2. Off the heat, combine egg, yolks, lemon juice and sugar into a large heat resistant mixing bowl and whisk until the sugar dissolves. 
  3. Reduce the heat to low, once the water comes to a gentle boil, set the mixing bowl over it, add the soft butter and stir constantly using a silicone spatula until the mixture begin to thicken, about 12 minutes.
  4. The mixture should be thick enough to coat the back of a spoon and tt should register 160F or about 71C on the thermometer. Remove from the heat.
  5. Using the spatula, immediately push the curd through a fine strainer into a medium glass bowl. Pour the lemon curd into the baked crust.
  6. Bake until the center is just set, 13-17 minutes. Transfer to a wire rack and let cool for 20 minutes. Cover and refrigerate until well chilled at least 3 hours before cutting it into squares and serve.


Sunday, December 8, 2013

Round Braided Brioche


I can never tired of breads...sometimes it is just the same bread all over again but I'm making it or trying it using a different element. This brioche recipe is the same recipe that I used for the past few years but I don't think I have ever put it on in this blog. Normally I will use a strong flour but today I am making it using unbleached plain wheatflour (10% -11% gluten) and mixed it with a small amount of strong white bread flour (13% gluten). The texture of this bread recipe using a strong bread flour is more chewy because of the high percentage of gluten inside it (see Challah) whereas if using an unbleached white plain flour, it produces a slightly flatter and denser texture as seen below. It is a bit crumbly, but not as crumbly as a cake. But the taste it still the same. So, if you want a slightly denser bread, you may want to add up to a 1/2 cup of strong flour on top of 500gm unbleached plain wheatflour. I think, the one using strong bread flour is a bit lighter...

Ingredients:
200ml warm milk
2 tsp active dry yeast
60gm sugar
90gm melted butter
2 eggs
500 gm strong bread flour, more if needed
1 tsp salt
Instructions:
  1. Combine the warm milk & sugar in a mixing bowl of a stand mixer and sprinkle the yeast over the top. Lightly whisk to blend and let it stand for 5-10 minutes until foamy.
  2. Add the egg, butter, 500gm flour and salt. Place the bowl on the mixer with a dough hook. Knead on low speed for 8-10 minutes. If using unbleached flour, you may want to add one tablespoon at a time and up to 1/2 cup of flour until the dough does not sticking to the sides of the bowl.
  3. Remove the dough from the bowl. Form it into a ball, transfer it into a lightly oiled bowl and cover with lightly oiled plastic wrap. Let the dough rise in a warm place until double in size, about 1.5 hours. 
  4. Turn the dough out onto a lightly floured surface and lightly knead, add more flour if needed. Divide dough into 4 equal pieces. With flattened hand, roll each piece back and forth, forming a 15 inch rope with tapered ends.
  5. Line a baking sheet with parchment paper or a silicone mat and lay 2 ropes horizontally and 2 ropes vertically on the sheet crossing each other, just like lattice pastry. Weave or braid the ropes together accordingly into a round shape. Pinch together the four ends and tuck them under the bread.
  6. Cover the braid loosely with oiled plastic wrap or clean kitchen towel and put in a warm place, let rise 40-50 minutes. Meanwhile, preheat oven to 180 degrees C a few minutes before baking.
  7. Glaze the braid with beaten egg and bake in the preheated oven for about 15-20 minutes until golden.
  8. Cool completely on a wire rack before slicing it with serrated knife.


Monday, November 25, 2013

Tiramisu-in-a-cup

Monday Blues? ...no more, honey!


Open your fridge
Grab a tiramisu in a cup
Take off your shoes
Turn on the music
Indulge!


Note:
The recipe is half of the tiramisu found in this page.

Saturday, November 16, 2013

Bread's 4 Essential Ingredients

For me breadmaking is therapeutic....it can easily provide you satisfaction seeing the yeast becoming active and foamy in the warm water. When the dough doesn't stick to the sides of the bowl, you will feel relieved knowing the gluten has actually worked. The soft and elastic dough while you kneading it with your bare hands makes you very happy because you are more that half way through before having some freshly baked breads on the table for breakfast. I like making bread and seeing my children eating the bread that I made...just priceless.

The Bread Bible by RLB listed 4 essentials ingredients in making bread - unbleached wheatflour, water or other liquids, yeast and salt. It is simple, isn't it? So talking about flour, what type of flour to use in making bread? The simplest way of choosing the flour is...look for a bread or strong flour. Bread flour or strong flour is normally used interchangeably, so what is strong flour? It is a flour with a protein content between 12%-14%. Another type of flour that can be used is unbleached all purpose flour with 8%-11% protein. You can check the amount of protein at the back or side of the packaging. 

If you are using normal plain/all purpose flour for a recipe that calls for bread flour, just replace:
1 cup bread flour = 1 cup plus 1.5 tablespoon all purpose flour


Other ingredients that are commonly used in bread is sweeteners such as sugar or honey or maple syrup, and fat such as butter and oil.


Sunday, November 3, 2013

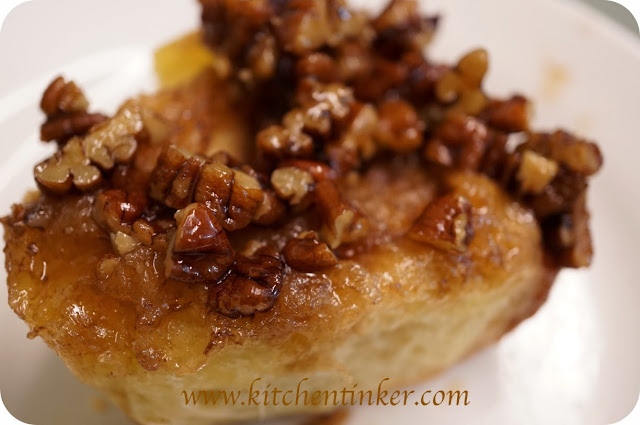
Maple Pecan Sticky Buns


Dough

Ingredients:
1/2 cup warm milk
1/4 cup sugar
1.5 tsp active dry yeast
1 large egg plus 1 egg yolk, at room temperature
2.5 cups bread flour  (I used 1.5 cups bread flour & 1 cup cake flour)
1/2 tsp salt
113g or 4oz unsalted butter, soft at room temperature

Instructions:
  1. Combine the warm milk & sugar in a mixing bowl of a stand mixer and sprinkle the yeast over the top. Lightly whisk to blend and let it stand for 5-10 minutes until foamy. 
  2. Add the egg and egg yolk and whisk until combined. Add in the flour and salt and place the bowl on the mixer with a dough hook. Knead on low speed for 2 minutes and increase to medium speed for 1 minute. With the mixer still running, add the soft butter, 1 tbsp at a time, allowing each addition to blend well before adding the next. Once all the butter has been added, let the mixer knead the dough for another 5-6 minutes at medium low speed, until the dough looks soft and silky.
  3. Remove the dough from the bowl. Form it into a ball, transfer it into a lightly oiled bowl and cover with lightly oiled plastic wrap. Let the dough rise in a warm place until double in size, about 1.5 hours. 
  4. Start preparing the topping & filling (recipe follows).
  5. Punch down the dough and turn it onto a lightly floured surface. Press down the dough firmly to flatten it and expel the gas. Dust the top with some flour. Roll the dough into a 10x16 inches rectangle. Position the dough so that one of the long sides is parallel to the edge of your work surface.
  6. Using a metal or silicone spatula, spread the filling over the dough, leaving a 1 inch border along the long side opposite you.
  7. Beginning with the long edge closest to you, roll the dough into a cylinder, gently tucking and tightening as you roll. Gently but firmly. Wet your finger and gently run your wet finger over the long edge opposite you (it will serve as a glue to seal the roll). Finish rolling the dough onto the border. Roll the dough backwards so that the seam facing upward and pinch all along it to seal the dough. Turn the seam side down and cut the roll into 10-12 equal pieces. Set each bun with a cut side up on your work surface and gently flatten it a bit with the palm of your hand. Place the buns into the prepared cake pan, spacing them evenly. Cover loosely with a plastic wrap and let them rest for 45 minutes. 
  8. Preheat the oven to 180C. Bake for 30-35 minutes until the buns are deep golden brown. Transfer to a cooling rack for 5 minutes. 
  9. Run a metal spatula around the edge of the pan to loosen the buns, invert the bun over a large baking sheet . You have to do this while the buns are still quite warm or else the topping will stick to the pan.

Topping
90g or 3 oz unsalted butter, softened
1/3 cup firmly packed light brown sugar
1/3 cup maple syrup
1 cup chopped pecans

In a mixing bowl of a stand mixer or a hand mixer, combine the butter and sugar and beat for 2-3 minutes until creamy and a bit pale. With the mixer still running on medium speed, pour the maple syrup in a thin stream down the sides of the bowl and blend until smooth. Scrape the topping into a 12 inch  cake pan and spread evenly. Scatter the chopped pecans over the top. Set aside.

Filling
60g or 2 oz unsalted butter, softened
1/3 cup firmly packed brown sugar
1/2 tsp ground cinnamon

Place all ingredients in a mixing bowl of a stand mixer and beat for 2-3 minutes until creamy and lightened.


Friday, November 1, 2013

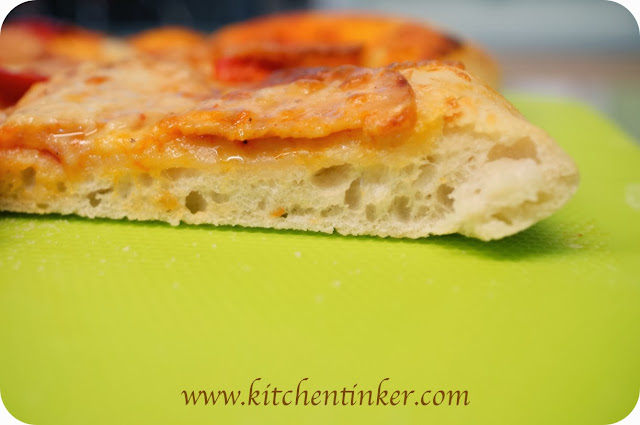
Chicken Pepperoni Pizza


Ingredients:

The Crust

5 tsp active dry yeast
2 1/4 cups warm water
2 tsp sugar
1/4 cup olive oil
5 cups bread flour, plus some extra as needed
1 tbsp salt
Plain flour and semolina flour for rolling and shaping

The Topping

2 tbsp olive oil
2 cups instant spaghetti sauce
200gm sliced chicken pepperoni or salami
1 cup grated cheddar cheese
2 cups grated mozzarella cheese
2 medium sized portobello mushroom - cleaned and sliced
1 red capsicum - chopped


Instructions:

By hand:
  1. In a very large bowl, dissolve yeast & sugar in the warm water and let stand for 5-10 minutes until foamy.
  2. Add oil, flour and salt. Stir with your hand until a rough ball forms, don't worry if it is still sticking to your hands at this stage. Using a plastic pastry scraper, scrape the dough onto a lightly floured surface. Knead the dough until smooth and elastic, 8-10 minutes. Add up to a cup of extra flour while kneading to prevent the dough from sticking.
By stand mixer:
  1. Or...if you are already fit enough :) and do not need extra exercise, dissolve the yeast in a mixing bowl of a stand mixer and let stand until foamy, add the oil, flour and salt and place the bowl on the mixer with a dough hook. Knead on low speed for 10 minutes.  Add up to a cup of flour while kneading so the dough will not be sticking from the sides of the bowl.
  2. Remove the dough from the bowl. Form it into a rough ball, transfer it into a lightly oiled bowl and cover with lightly oiled plastic wrap. Let the dough rise in a warm place until double in size, about 1.5 - 2 hours. Beware...the bowl must be big enough!
  3. Preheat the oven 250C for at least 30 minutes before baking.
  4. Turn the dough onto a lightly floured surface. Cut the dough half . Gently shape each half into a loose ball. Cover loosely with the plastic wrap and let them rest for 10 minutes.
  5. Lightly dust 1 dough ball with plain flour and roll it into a round 30cm in diameter or a rectangle
  6. Sprinkle 2 tbsp semolina flour on your baking tray and transfer the dough onto the tray.
  7. Brush the top of the dough with olive oil.
  8. Spread 1 cup spaghetti sauce over the surface. Sprinkle half of the cheddar cheese. Scatter half of the pepperoni and vegetables. Top with 1 cup mozzarella.
  9. Bake the pizza for 10-15 minutes until crisp and golden.  Repeat with the other half dough.

Sunday, October 20, 2013

Perfect Mashed Potato - step by step


This post is on behalf of my son, Naim.
The recipe is adapted from Masterclass No. 2 of MasterChef Australia Season 5 by Gary Mehigan.


Heat water in a large pot until it reaches boiling point. Cut up half a kilo of potatoes into two. Put them in a boiling water for 15 minutes until tender. Drain them in a colander and discard the water.


Working very quickly, using a pastry scrapper press the potatoes through the back of a large sieve or potato ricer into the same pot.  


Stir in the about 2 tbsp milk and 1/4 cup soft butter until very smooth.


 Season with salt and pepper if you like. It is also perfect as it is.


 Serve with roasted chicken with onion gravy. Perfect!


Lemon Chiffon Cake


The Cake

Ingredients:
4 medium sized lemons
2 1/4 cups cake flour
1 tbsp baking powder
1 tsp salt
1 1/2 cups caster sugar
1/2 cup vegetable oil
1/4 cup water
6 large eggs, separated, at room temperature
1/2 tsp cream of tartar


Instructions:
  1. Preheat the oven to 150 degrees Celsius and prepared one 25cm 2-pc ungreased tube pan or chiffon cake pan with removable bottom.
  2. Grate the zest from the lemons and set aside. Juice the lemon and strain the juice into a cup. You should have 1/2 cup or 4 fl oz juice. 
  3. Combine and sift flour, baking powder and salt into a medium bowl. Add in the sugar and whisk until the sugar incorporated with the flour. In a large mixing bowl, combine the oil, water, egg yolks, lemon juice and lemon zest. Using a whisk, beat until well blended. Using a silicone spatula, fold in the dry mixture into the wet ingredients until the batter is smooth.
  4. In a mixing bowl of a stand mixer fitted with whisk attachment, combine the egg whites and cream of tartar and beat at medium speed until soft peaks form.
  5. Using a silicone spatula, gently fold in one spoonful of the egg white into the yolk batter and carefully blend them together. Then fold in the remaining egg white mixture into the batter until combined.
  6. Pour batter into the ungreased tube pan and bake for 50 minutes or until a cake tester inserted into the center of the cake comes out clean.
  7. Immediately after removing the cake from the oven, turn the pan upside down and place it on a flat surface for cooling process. Let the cake cool for about 1- 2 hours before removing it from the pan.

The Citrus Glaze

Ingredients:
2 cups icing sugar, sifted
2 tbsp lemon juice, strained
1 tbsp heavy cream

Instructions:
In a small bowl, whisk together all the ingredients until the sugar dissolves and the glaze is smooth. Add a few drops of lemon juice if too thick, add a little more sugar if too runny.

Loosen the cake from the tin and glaze as pleases... :)


Saturday, October 12, 2013

And the journey begins...


Farewell....my lovely friend!
We missed you already...


Hope we can do this again sometimes...


And the journey begins....Good Luck!

Tuesday, October 1, 2013

Yellow Butter Cupcakes


Theme: Butter & Buttermilk
Title: Yellow Butter Cupcakes
Inspirations: Rose's Heavenly Cakes


Ingredients:

2 large eggs, at room temperature
2/3 cup buttermilk, divided
1 1/2 tsp vanilla essence
2 cups cake flour, sifted into the cup and leveled off
1 cup minus 2 tbsp sugar
1/2 tsp baking powder
1/2 tsp baking soda
1/2 tsp salt
170g unsalted butter, at room temperature

Instructions:
  1. Center a rack in the oven and preheat to 160C(fan forced). Have ready 16-18 cupcake liners set in muffin pans.
  2. In a small bowl, whisk the eggs, 3 tbsp of the buttermilk and the vanilla until lightly combined.
  3. In a bowl of a stand mixer, mix the flour, sugar, baking powder, baking soda and salt on low speed for 30 seconds. Add the butter and the remaining buttermilk and mix on low speed until the flour mixture is moistened. Raise the speed to medium and beat for another 1 minute. Scrape down the sides of the bowl.
  4. Gradually add the egg mixture in two parts, beating on medium speed after each addition. Scrape down the sides of the bowl and fold using a silicone spatula until smooth.
  5. Scoop the batter using a small spoon into the cupcake liners until 3/4 full. Smooth the top using the back of a spoon.
  6. Bake for 15-20 minutes until a wire cake tested inserted into the center comes out clean.
  7. Cool cakes in the pan for 10 minutes. Remove from the pan and set them on a wire rack to cool completely


Sunday, September 29, 2013

Fudgy Chocolate Layer Cake

This recipe is from F&W magazine. But of course with a little bit adjustments, I only make 2 layers instead of 3. I also sandwiched the cake layers with whipped cream. I whipped 1/2 cup whipping cream and a tablespoon of sugar until firm peaks form. Other than that, just follow the recipe.


Theme: Chocolate
Title: Fudgy Chocolate Layer Cake
Inspiration: F&W Magazine


Cake

Ingredients:
1 1/2 cups sugar
1 1/4 cups all-purpose flour
3/4 cup unsweetened cocoa powder
2 1/2 teaspoons baking powder
1 1/2 teaspoons baking soda
1/8 teaspoon salt
1 cup buttermilk
3 large eggs
2 1/2 teaspoons pure vanilla extract
6 tablespoons unsalted butter, softened
1 cup hot coffee

Filling and Frosting

Ingredients:
1 1/4 pounds bittersweet chocolate, finely chopped
1 cup heavy cream
2 tablespoons light corn syrup
5 tablespoons unsalted butter, softened
1 tablespoon sugar
1 tablespoon water 
 
 Instructions:
  1. Preheat the oven to 160C(fan forced). Line the bottoms of three 8-inch round cake pans with rounds of parchment paper. Spray the pans and the parchment paper with vegetable cooking spray.
  2. In a large bowl, whisk the sugar with the flour, cocoa powder, baking powder, baking soda and salt. In a small bowl, whisk the buttermilk with the eggs and vanilla. In another small bowl, melt the butter in the hot coffee. Using an electric mixer, beat half of the buttermilk mixture into the dry ingredients at low speed. Beat in half of the coffee mixture, then scrape down the bowl. Beat in the remaining buttermilk and coffee mixtures.
  3. Pour the batter evenly between the prepared pans and bake for 25 to 30 minutes, rotating the pans halfway through baking, until the cakes are springy to the touch. Let the cakes cool in the pans for 10 minutes, then turn the cakes out onto a rack to cool completely. Peel off the parchment paper.
  4. Put the chocolate in a large bowl. In a small saucepan, bring the cream and corn syrup to a boil. Immediately pour over the chocolate and let stand in a warm place for 5 minutes. Gently whisk the ganache until smooth. Whisk in the butter until incorporated. Refrigerate, stirring frequently, until the ganache is thick enough to spread, about 30 minutes.
  5. In a microwave-safe bowl, combine the sugar with the water and heat for 30 seconds. Stir to dissolve the sugar. Set a cake layer on a cake plate or cake cardboard and brush lightly with the sugar syrup. Spread about 3/4 cup of the frosting onto the cake in an even 1/4-inch layer. Repeat with the remaining cake layers, sugar syrup and frosting. Spread the remaining frosting around the sides of the cake. Let the cake stand at room temperature for at least 1 hour before slicing.


Sunday, September 22, 2013

Coconut Layer Cake with Swiss Meringue Frosting


I'm in the mood of making layer cakes. Lemon Mascarpone Layer Cake that I baked last week was excellent. There's always a reason why we need to chill certain kind of cakes before cutting and serve it. After an overnight chilling, the flavor of the lemon curd has intensely blended with the sponge cakes and it tasted great. I definitely will bake that again.

A few days ago, my girlfriends and I went to Ben's at BSC for lunch and we also ordered some desserts. One of them was Coconut Cakes and I thought of baking a coconut cake for the weekend. No....I'm not trying to replicate Ben's Coconut Cake, instead I'm doing my Williams Sonoma book's Coconut Layer Cake.


Coconut Cake

Ingredients:

2 1/4 cups cake flour
2 tsp baking powder
1/2 salt
3/4 cup unsalted butter, at room temperature
1 1/2 cups sugar
3 large eggs, separated, at room temperature
1 tsp vanilla essence
1 cup coconut extract /coconut milk
1 cup loosely packed sweetened coconut

Instructions:
  1. Preheat oven to 160C(fan forced). Grease two 9-inch cake pan and line with a parchment round.
  2. In a medium bowl, sift together flour, baking powder and salt. Set aside.
  3. In a bowl of a stand mixer or you can also use a handheld mixer, beat the butter and sugar until light in color and fluffy. Beat in the egg yolks and vanilla. Remove the bowl from the mixer. 
  4. Using a silicone spatula, gently fold in 1/3 of the flour mixture until almost incorporated. Fold in half of the coconut milk, and then fold in another third of the flour, followed by the other half of the coconut milk. Add the remaining flour and fold the ingredients until fully incorporated, and try not to overwork the batter or else the cake will be tough.
  5. In a clean mixing bowl of a stand mixer, whip the egg whites on medium-high speed until medium peaks form. Using a silicone spatula, fold in the egg whites into the batter, and then fold in the coconut.
  6. Divide the batter evenly between the pans. Bake for 25 minutes. Transfer the cakes to a wire rack and let cool in the pans for 3 minutes. Invert the pans onto the wire rack and lift of the pans. Peel of the parchment paper. Let cool completely.


Swiss Meringue Frosting

2 large egg whites, at room temperature
3/4 cup sugar
1 tbsp corn syrup
1/8 cream of tartar
2 tbsp water
Juice of 1/2 lemon
1/2 tsp vanilla essence
2 cups loosely packed sweetened coconut
Lemon Curd

Instructions:
  1. Set a saucepan filled with 1 inch water over a medium heat and bring to a simmer.
  2. Off the heat, combine egg, sugar, corn syrup, cream of tartar, water and lemon juice into a large heat resistant mixing bowl and whisk until blended. 
  3. Set the mixing bowl over the saucepan and whisk constantly while frequently scraping the edges until the mixture begin to thicken, about 10 minutes (an instant thermometer will register 75C). 
  4. Remove from heat, using a hand mixer or stand mixer fitted with whip attachment, beat the mixture at high speed until stiff and glossy, about 7 minutes. Using a silicone spatula, fold in the vanilla and half of the coconut.
Assemble the cake:
  1. Lay one cake layer cut side-up on a cake stand. Tuck in strips of baking paper under the cake edges to keep the plate clean.
  2. With a metal frosting spatula, evenly spread some lemon curd on top of the cake. Place a second cake layer on top of the curd.
  3. Using a frosting spatula, frost the sides and top of the cake with the frosting. Sprinkle the remaining coconut all over the cake.


Monday, September 16, 2013

Lemon Mascarpone Layer Cake


Theme: LEMON
Title: LEMON MASCARPONE LAYER CAKE

Cast:
Lemon Curd
Sponge Cakes
Lemon Syrup
Mascarpone Filling


Lemon Curd

Ingredients:
3 large eggs
3 large egg yolks
1 cup minus 1tbsp sugar
3/4 cup strained freshly squeezed lemon juice
6 tbsp cold unsalted butter, cut into 1/2 inch pieces

Instruction:
  1. Set aside a large bowl filled with 2 inches cold water and some ice.
  2. Set a saucepan filled with 1 inch water over a medium heat.
  3. Off the heat, combine egg, yolks and sugar into a large heat resistant mixing bowl and whisk until blended. Add the lemon juice and and mix well.
  4. Reduce the heat to low, once the water comes to a gentle boil, set the mixing bowl over it and whisk constantly while frequently scraping the edges until the mixture begin to thicken, about 7-10 minutes. Be careful not to overcook the yolks. 
  5. A finished curd is done when it hold its shape, when the whisk is lifted and a bit of curd falls back into the bowl, it should remain distinct on the surface rather than blending back into the mixture. It should register 180F or about 80C on the thermometer. Remove from the heat.
  6. Using a spatula immediately push the curd through a fine strainer into a medium glass bowl. Add the cold butter into the curd, burying them so they could melt quickly. Whisk until smooth and all the butter bits blended with the curd. Press a plastic wrap directly onto the surface of the curd.
  7. Set the bowl in the large bowl of ice water. Once the curd is cooled, store in the refrigerator until needed.


Sponge Cakes

Ingredients:

6 large eggs, separated
7 tbsp plus another 7 tbsp sugar
1 3/4 cups sifted cake flour

Instructions:
  1. Preheat oven to 175C(fan forced). Have ready 2 9-inch cake pan fitted with a parchment round. Do not grease the pan.
  2. In a bowl of a stand mixer or you can also use a handheld mixer, beat the yolks and 7 tbsp sugar until thick and pale, about 4 minutes. Transfer into a large bowl and set aside.
  3. In a mixing bowl of a stand mixer, whip the egg whites on medium speed to soft peaks, With the mixer still running, gradually add the remaining 7 tbsp sugar and beat until firm peaks form. Using a silicone spatula, fold in 1/3 of the egg whites into the beaten yolks, sift half of the flour over the top and gently fold it in. Repeat. Fold in the last egg whites until smooth and fully blended.
  4. Divide the batter evenly between the pans. Bake for 18 minutes. Transfer the cakes to a wire rack to cool completely.
Lemon Syrup

1/2 cup sugar
1/2 cup water
1/4 cup freshly squeezed lemon juice

Heat the sugar and water in a small saucepan, stirring occasionally until the sugar has completely dissolved and the liquid is clear. Remove from the heat and cool completely. Stir in the lemon juice.


Mascarpone Filling

Ingredients:

2 1/4 cups heavy whipping cream
7 tbsp sugar
1 pound or half a kilo mascarpone cheese

Instructions:
  1. Combine the cream and sugar into a mixing bowl. Refrigerate the bowl together with the whisk attachment for 10 minutes. Using a stand mixer fitted with the whisk attachment, whip until soft peaks form.
  2. In a large bowl, combine the mascarpone and 1 cup of the lemon curd and stir until blended. 
  3. Gently fold in the whipped cream until the mixture is fully blended and thick.
  4. Divide the filling into 3 portions for filing the layers, frosting and piping. You may want to set aside more for piping decorations.

Assemble the cake:
  1. Run a metal spatula around the edge of the pan to loosen the cake and transfer them onto a flat surface. Using a serrated knife, slice each cake horizontally into 2 layers. Set aside one of the bottom layers to use last.Take off the parchment paper.
  2. Lay one cake layer cut side-up on a cake stand. Tuck in strips of baking paper under the cake edges to keep the plate clean.
  3. Brush the cake with 1/4 of the lemon syrup. With a metal frosting spatula, spread 1/3 of of the mascarpone filling on top. Place 3 tbsp of remaining lemon curd on top of the filling and spread evenly to the edge. Place a second cake layer on top, cut side up and repeat with syrup, filling and curd. Repeat with the third layer.
  4. Top with the last layer, cut side down. Moisten with remaining lemon syrup. Frost the whole cake with the reserved mascarpone for frosting.
  5. Transfer the reserved mascarpone for piping into the pastry bag and pipe your choice of decorations over the entire top or the whole cake, it can be rosettes, stars or hydrangeas. Put a few tbsp of the lemon curd into a plastic disposable piping bag, make a small tiny cut at the edge and pipe it onto the top of the rosettes or stars. Refrigerate at least 4 hours before serving.


Print