
Monday, December 31, 2012
Sunday, December 30, 2012
Baked Macaroni Bolognaise

We woke up around 4 am today as we need to send off my maid of 4 years back home. We reached airport around 5:20am and after saying goodbye to her, we took off from the airport around 7:15am. On the way back, we dropped by the P9 hawker center to pack some breakfast, roti canai and nasi dagang. Reached home around 8:45am and straight away eat lah! So quite full by afternoon. Just baked this for afternoon tea.
Ingredients:
250 gm macaroni - Cook them as per packet instruction and drain the water. Put aside.
200 gm minced beef
1 yellow onion - diced
2 tbsp olive oil
1 can of spaghetti sauce Prego or Kimball or whatever brands that u like
Salt & pepper to taste
1 tsp sugar
1/4 cup of grated parmesan cheese
1 cup of mozarella cheese
- Heat the oil in a saucepan or a heavy bottomed pan.
- Sautee the onion and stir for about a minute or until translucent.
- Add the beef and cook until it is brown and crumbly.
- Pour the whole can of sauce and fill up half of the can with water and add to the sauce. Add a pinch of salt and pepper to taste. Let it simmer for about 10-15 minutes, stir occasionally. Put aside.
Let's bake:
- Heat your oven 175 degrees Celsius
- Grease you casserole with some olive oil.
- Put the pasta, then pour the sauce and mix well. Smooth the top with the back of your spoon.
- Sprinkle the parmesan cheese evenly on top followed by the mozarella.
- Put it in the oven for 15 minutes and enjoy!

And the dessert Orange Chiffon Cake.

The recipe can be found here.

Ribena Strawberry-licious Smoothies
 |
| As he was running out to the garden to pick up the mint leaves, the ice has already melted because today was quite hot |
This is not my recipe...so on behalf of my son Naim who invented this smoothies, I am sharing with you because yes as what the name claimed..it was delicious :)
2 cups ice cubes
4 tbsp Ribena Strawberry
1/2 cup of grape juice
1/4 apple juice
Let's make it:
Blitz them all in a blender or smoothie maker. Serve.

Tuesday, December 25, 2012
Triple Chocolate Cookies

Another batch of chocolate chip cookies this weekend...it's like a must to bake cookies every weekend just because the 2 year old has already stopped taking milk formula for the past one month, so his eating habit is like MASSIVE! Have to deal with his sugar overdosed as well...very hyper! This recipe was adapted from Triple Chocolate Chip Cookies from Williams-Sonoma book entitled Essentials of Baking.
Ingredients:
2 1/2 cups all purpose flour or cookie flour
2 tsp baking soda
1 tsp salt
1 cup unsalted butter, at room temperature
3/4 cup firmly packed brown sugar
1/2 cup white sugar
2 eggs
2 tsp vanilla essence
1 cup semisweet chocolate chips
1 cup chopped milk chocolate
1/2 cup chopped bittersweet chocolate
Let's bake'em!:
- Preheat oven to 175 degree Celsius
- Line baking tray with grease paper or silicone mat
- Whisk the flour, salt and soda in one big mixing bowl, you can also sift it if you want instead of whisking it.
- Using electric mixer, cream butter and both sugars until white and creamy. Add eggs one by one and mix just until combined. Pour the vanilla extract.
- Fold in the flour mixture with the mixer running at low speed.
- Fold in the chips & both chocolate using a spatula.
- Spoon the batter onto the baking tray, an inch apart from each other. I used an ice cream scoop to get an even size.
- Bake for 10-12 minutes, turning the tray after 3/4 baking time.
- Let the cookies cool on baking sheet for 5 minutes then transfer them to wire rack to cool completely.


Sweet Dinner Rolls

Sweet Dinner Rolls
Ingredients:
 1/2 cup warm water
1/2 cup warm milk
75g unsalted butter
1 tsp salt
1 egg
1/3 cup caster sugar
3 3/4 cup bread flour
1 tbsp dry active yeast
1/4 cup butter, softened
Directions:
- Place water, milk, egg, 75g butter, sugar, salt, flour and yeast in the pan of the bread machine in the order recommended by the manufacturer. Set for Dough/Knead and press Start.
- When cycle finishes, turn dough out onto a lightly floured surface. Divide dough in half. Roll each half into a 12 inch circle, spread 1/4 cup softened butter over entire round. Cut each circle into 8 wedges. Roll wedges starting at wide end; roll gently but tightly. Place point side down on ungreased cookie sheet. Cover with clean kitchen towel and put in a warm place, let rise 1 hour. Meanwhile, preheat oven to 200 degrees C.
- Bake in preheated oven for 10 to 15 minutes, until golden.

Monday, December 24, 2012
Kuih Lapis Red Dots
The tagline of this blog includes experience and experiment...why? so that I don't feel bad if I failed to do or achieve something for the first time :). I have never attempted traditional kuih just because I love them so much so I wouldn't even dare to try and mess with them. Apart from puteri ayu, kaswi, kuih talam, talam suji and so many more, I love kuih lapis since my childhood days. Those days, whenever there is a kenduri kahwin in my kampung, you can find easily find them there. In our canteen school, it was like a must to sell kuih lapis. I like to eat it layer by layer...indulging it to the last layer on top which normally in dark pink. So, I challenged myself to make kuih lapis...thanks to a friend of mine HAH who was willing to get me the much awaited periuk kukus cap boyo from Kelantan, today is like Hari Ini Dale Sejarah...

I was trying to get the yellow and green that were used my Kak Siti Delima from her blog. But I didn't get the right color so I just go with the flow...hehe..which includes the red dots.

Here is the recipe for the kuih lapis which I took from Kak Siti. But of course the color didn't as attractive as hers. Thanks for the recipe ye Kak.
Kuih Lapis 3 Warna
Resipi : Che CT
Bahan-bahan:
2 cawan tepung gandum
1/4 cawan tepung jagung
1/4 cawan tepung beras
3/4 cawan gula pasir
3 1/2 cawan santan - tambah jika perlu
1 camca teh garam
1 sudu kecil pewarna Kuning + 1/ 2 sudu teh perisa pisang
1 susu kecil pewarna Hijau + 1/2 sudu kecil pandan emulco
Cara-cara:
- Panaskan periuk kukus. Sapukan loyang 7/8 inci dengan sedikit minyak. Dan alas dengan plastik bersih dan lebihkan sedikit keluar loyang agar mudah untuk mengeluarkan kuih lapis nanti. Masuk loyang dalam periuk kukusan.
- Campurkan kesemua bahan kecuali pewarna dan perisa. Kacau dengan whisk hingga gula larut.
- Tapis adunan dalam mangkuk lain dan bahagikan kepada tiga bahagian sama banyak.
- Satu bahagian diwarnakan kuning dan perisa pisang, satu lagi warnakan hijau dan perisa pandan satu lagi biarkan plain saja.
- Mulakan lapisan bawah dengan warna putih. Kukus selama 7 - 8 minit atau hingga masak baru tindih dengan lapisan hijau dan seterusnya warna kuning.
- Buat berulang-ulang hingga habis adunan tadi. Dan yang akhir sekali balut tutup kukusan dengan kain bersih dan kukus selama 15 minit.
- Bila dah siap 15 minit, buka tutup kukusan dan biar adunan dalam periuk kukusan 3 minit lagi. Kemudian baru ditutup api dan angkat kuih. 8. Sejukkan betul-betul dahulu kuih barulah dipotong dan hidang.
Sunday, December 23, 2012
Balik kampung & belated birthday party


Ini la rambutan dari pokok nan sebatang ni rumah kampungku. Satu merah satu kuning. Inilah juga pemandangan yang dapat dilihat di sepanjang jalan dari WP ke N9. Semua pokok-pokok rambutan di kampung-kampung yang ku lalui semuanya sedang masak ranum, yang merah dan kuning. Kebanyakan rumah-rumah kampung mempunyai halaman yang besar jadi banyaklah pokok-pokoknya...mungkin sampai tak termakan dek tuan rumah. Manggis juga sedang bebuah dengan hebatnya tapi masih muda, mungkin bulan depan musim manggis pulak.
So, ceritanya minggu ini aktiviti balik kampung together-gether dengan kakak-kakakku, anak-anak saudaraku dan cucu-cucu saudaraku. Sangat meriahlah kannn... Memandangkan ada 2 November birthday boys plus sorang birthday boy tua bangka...so kami pun memang nak celebrate lah sekali Saturday night semalam. Iman on November 18th and Suhail, cucu saudaraku on November 27th ...and yang tua bangka tak yah sebutlah. Happy Birthday anyway...dah hit 3 series ok!
 | ||||
| Hearty Birthday Brownie |
These are the boys trying to hembus the magic candle...makin hembus, makin sparkle, makin besar apinya....GOTCHA!!!!

 |
| Mak Yam in the pink pants also tried to blow from afar...hehe |
For the makan-makan, I made the Hearty Brownie (Brownie Kasih Sayang from the earlier entry) and RV also from the previous entry. Mashy ordered the recent craziness of Durian Crepe and some blueberry cheese tarts, my sis L made the cream caramel and my sis F cooked the nasi & gulai daging lomak lado api. Thanks all for the simple birthday party at our kampung. Can we like do this for January babiessssss.....ramai wooo Jan's birthday! Makcik, Hariz, Ikram, Nazira, Nazihah...sapa lagi angkat tangan! :)
 |
| RV |
 |
| Blueberry Cheese Tarts |
 |
| Sapa punya Durian Crepe |
 |
| Baby paling kuat makan! |
Tuesday, December 18, 2012
Tiffany - what is the authentic one looks like
This is something that I want to share with friends that probably have the same interest with me...TIFFANY! This posting is not to show off my jewelry but to share some important tips if you want to buy them online.
Most of the tips are extracted from ebay, ehow and many reviews from the www. All the information is validated with my own photos of my own jewelry below.
First and foremost, Tiffany does not have SALES!
Second, Tiffany does not have OUTLETS!
Okay, below are the main characters of the authentic Tiffany products. I can only tell you based on the bracelets that I own because I only like the bracelets and probably will purchase the charms next.
The box the item comes in should be a robin's egg/baby blue. It
should
feature the Tiffany's logo indelibly stamped on with a glossy finish.The
purchase may also be tied with a white satin ribbon.


The item should be heavy in hand, and not feel hollow or plastic.

All items will be stamped and / or signed and marked with the appropriate metal signature (i.e. 925 for sterling silver).
925, the mark of sterling silver for the 'Please Return to Tiffany' as shown above & below, should be engraved on the half-loop above the heart. It should NOT engraved on the actual heart.

The back of the heart should have Tiffany & Co 925 smoothly engraved
at the very top of the heart. This engraving should be as close to the
center indentation of the heart as possible.

This one is very small heart, with the Tiffany's signature baby blue color.


The lobster clasp on a Tiffany bracelet or necklace will show EXCELLENT
workmanship. In fact,
the entire piece should be heavy and feel SOLID in your hand. Also,
here's a little secret, the lobster clasp will ALSO be stamped 925, at
the base of the clasp.


The links on any tiffany tag bracelet or tag necklace are NOT pinched together, they are soldered together and very smooth. You almost can't tell where the link begins or ends.
Hope it helps...more help can be found on ebay website.
Sunday, December 16, 2012
Soft & Chewy Chocolate Chip Cookies

Soft & Chewy Chocolate Chip Cookies
(from Martha Stewart Living)
Ingredients
2 1/2 cups all purpose flour or cookie flour
1/2 tsp baking soda
1 cup unsalted butter
1/2 cup caster sugar
1 cup firmly packed light brown sugar
2 eggs
2 tsp vanilla extract
1/2 tsp salt
1 cup chocolate chips
1 cup chopped milk chocolate
(But you can also use 2 cups of chocolate chips)
Method:
- Preheat oven to 180 degree Celsius
- Line baking tray with grease paper or silicone mat
- Whisk the flour, salt and soda in one big mixing bowl, you can also sift it if you want instead of whisking it.
- Using electric mixer, cream butter and both sugars until white and creamy. Add eggs one by one and mix just until combined. Pour the vanilla extract.
- Fold in the flour mixture with the mixer running at low speed.
- Fold in the chip & chocolate using a spatula.
- Spoon the batter onto the baking tray, an inch apart from each other. I used an ice cream scoop to get an even size.
- Bake for 8-10 minutes, turning the tray after 3/4 baking time.

 |
| Cookie treat after making Baked Pasta, look at those sweat which probably blended well with the pasta! That's why your sisters & brother love you so much :) |
Saturday, December 15, 2012
Grilled Chicken Chop with Jacket Potatoes
I am very very tired tonight, my knees hurt! :(
Did some wet market purchases this morning, then went to Alamanda afterwards with the whole family to buy school stuff for the kids. We had brunch at the Food Court there.
For dinner, made some grilled chicken chops with jacket potatoes , Naim made Baked Pasta Bolognaise and I also made some chocolate chips cookies for snacks. Now I'm blogging while elevating both feet...ouch!!

Grilled Chicken Chop
Ingredients:
4 pieces of deboned chicken thigh(get the butcher to cut for chicken chop)
Lots of black pepper
Salt
2 tbsp olive oil
4 tbsp of lemon juice
Let's grill them!:

Jacket Potatoes
Ingredients:
4 big russet potatoes
Garlic powder
Salt
Olive oil
4 knobs of butter
Cheddar cheese
Mozarella cheese

Okay..too tired to continue with the chocolate chip cookies....nitey nite!

Grilled Chicken Chop
Ingredients:
4 pieces of deboned chicken thigh(get the butcher to cut for chicken chop)
Lots of black pepper
Salt
2 tbsp olive oil
4 tbsp of lemon juice
Let's grill them!:
- Generously rub the chicken with salt and pepper. Pour the oil and juice and rub them all over. Put them in a container and cover. Let them marinated for 2-4 hours.
- Preheat the oven to 200 degree Celsius.
- Heat a frying skillet and drizzle some olive oil. Put one piece of the chicken and cook one side on a medium heat for about 4 minutes. Turn it over and cook another side for 4 minutes. Do the same for the remaining.
- Transfer all the chicken onto a baking tray lined with baking sheet.
- Bake for about 10 minutes, skin side up.
- Serve warm with onion gravy.

Jacket Potatoes
Ingredients:
4 big russet potatoes
Garlic powder
Salt
Olive oil
4 knobs of butter
Cheddar cheese
Mozarella cheese
- Preheat the oven to 200 degree Celsius
- Soak the potatoes with hot water for about 3 minutes to get rid of the dirt. Wash under cold water.
- Prick the potatoes with fork a few times. Rub the potatoes with garlic powder, salt and olive oil.
- Put them on a baking tray lined with baking sheet
- Bake for about 40 minutes
- Using the tip of a knife, slit each potato in the center and stuff the butter and some cheese inside. Bake for another 5 minutes.
- Serve with the chicken!

Okay..too tired to continue with the chocolate chip cookies....nitey nite!
Friday, December 7, 2012
Classic Dinner Rolls

First recipe would be Classic Dinner Rolls which I can also used as burger buns, making sandwich or just having it for breakfast with butter and strawberry jam.
Source: Williams Sonoma Essential of Baking
Ingredients:
2 1/2 tsp instant yeast
1/4 cup warm water
1 cup milk
2 tbsp sugar
2 large eggs at room temperature
6 tbsp unsalted butter, at room temperature
4 1/2 cups all purpose flour
2 tsp salt
1 beaten egg for glaze

Let's roll!
- In a large mixing bowl, dissolve the yeast and sugar in the warm water and set aside for 5-8 minutes to allow the yeast to activate.
- Whisk in the milk, 2 eggs, butter, flour and salt just until combined.
- Knead by hand until all ingredients well mixed and not sticking to the bowl. Remove the dough from bowl and invert it onto a lightly floured surface. Knead until it is very smooth and elastic for about 5-7 minutes.
- Form the dough into a ball and transfer it into a lightly greased bowl, cover with plastic wrap and allow the dough to proof until double in size (about 1.5 - 2 hours).
- Grease or line a baking pan with parchment paper
- Punch down the dough and invert it into a clean work surface. Cut in half with a bench scraper. Cut each half into 8 equal pieces.
- Roll each piece into a ball and place it on the prepared pan. Cover loosely with oiled plastic wrap and let them rest for about 30 minutes.
- Preheat oven to 200 degree Celsius
- Lightly brush the rolls with beaten egg. Put them on the center rack of the oven and bake until lightly golden brown for about 15 minutes. Serve warm.

Sunday, November 25, 2012

Saturday, November 24, 2012
Roasted Chicken with Onion Gravy
How about cutting off some fat? No cake or dessert this weekend ok...let's indulge into poultry and roast some birds..

Roasted Chicken


Roasted Chicken
Ingredients:
1 medium chicken
Salt & coarse black pepper
1 whole bulb of garlic
1/4 tsp cumin seeds (jintan putih)
1/4 tsp fennel seeds (jintan manis)
1 tsp coriander seeds (biji ketumbar)
4-5 big sized washed potatoes - each cut into 8 equal sizes
1 lemon
a handful of fresh thyme & rosemary
olive oil
Let's roast the bird!:
- Using a pestle and mortar, pound half of the garlic bulb with the seeds until it becomes a paste. Generously rub the chicken with the paste and a lot of salt and pepper. Put it in a big container, cover and leave it in the fridge for about 4-6 hours. I normally marinate it overnight because the meat will become really tasty.
- When you're ready to cook, preheat the oven to 190 degrees Celsius.
- Bring a large pan of salted water to a boiling point, put the potatoes together with the whole lemon and the other half of the garlic bulb into it and cook for 12 minutes.
- Drain and allow to steam dry for 1 minutes, take out the lemon & garlic and put aside. Toss the potatoes back in the pan while they are still hot. Put aside.
- Stab the hot lemon for about 10 times. Take the chicken from the fridge, pat dry with kitchen tower and rub it all over with olive oil. Push the lemon, hot garlic cloves and thyme into the cavity. Put the chicken into a roasting tray, cover with aluminum foil and bake for 45 minutes.
- Take off the foil and remove the chicken into a plate, toss the potatoes into the roasting tray together with the rosemary leave and shake the tray around. Push all the potatoes to the sides of the tray and put back the chicken in the center. Bake for another 40 minutes.
- Remove the lemon and garlic from inside the chicken and it is ready to serve with onion gravy.
Onion Gravy
Ingredients:
4 medium yellow onion, peeled and finely sliced
olive oil
5 tbsp balsamic vinegar
2 tbsp of butter
3 cups of chicken or beef stock - or just use 2 chicken stock cubes with 3 cups of water
2 tbsp cornflour
- Fry the onion in a little oil under a really low heat, covered, for about 15 minutes until soft and translucent.
- Remove the lid, turn the heat up and once the onions become golden brown, pour in the vinegar, stir and let it boil.
- Turn the heat down and put in the butter, pour the stock and stir. Let it simmer. Turn off the heat and sift the liquid into a bowl and discard the onion.
- Put back the liquid into the pan and let it boil. Add the cornflour and stir until you reach your preferred consistency.
adapted from JO's Jamie's Dinners book - modified to suit my taste

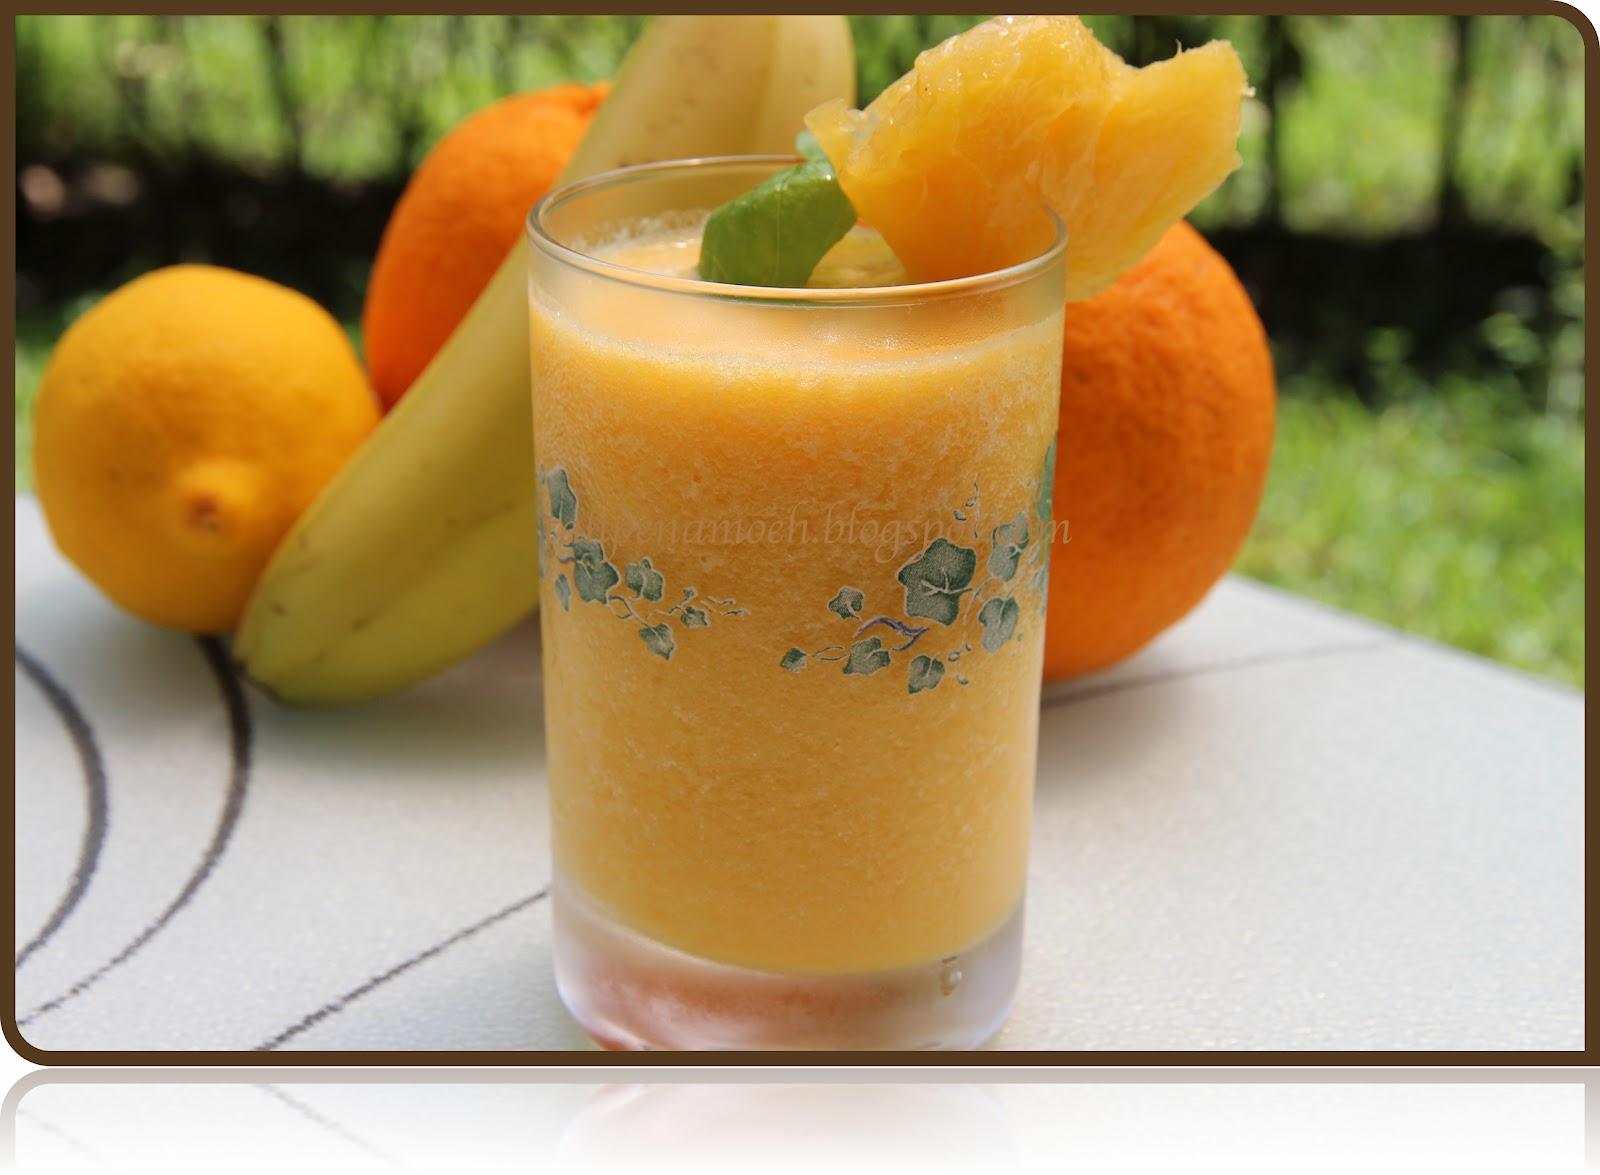
Aloha Sunrise Smoothies
I think today is a very nice bright sunny day, it has been raining most of the time even at night. This kind of nice weather should be accompanied by a nice cold and fresh fruit smoothies...Enjoy!

Ingredients:
1/2 cup frozen fresh pineapple
1/4 cup frozen pineapple in a can (water drained)
Juice from 2 large oranges or if you want it sweeter, you can also subtitute with 1 small cart (about 250ml) of orange juice
Let's make it:
Blitz them all in a blender or smoothie maker. Serve.
If you like it fizzy, can put 1/2 cup sprite in a jug, pour the smoothie into it and serve.

Subscribe to:
Posts (Atom)